Tuesday 6 November 2012

Intro to using Google maps and saving places


I recently helped one of my grade 2 teachers use Google maps to show where all of the kids in her class were from. Following are the instructions for creating and saving a map in google maps, adding locations, and then sharing the map with parents or on your blog. You can click on an individual picture to enlarge it.

Uses in the classroom:
  • Mapping items of significance during social studies.
  • Making a history tour, i.e. the location of Egyptian sites like the pyramids, Luxor, Valley of the Kings etc.
  • Have children label each continent.
  • Track famous journeys such as the voyages of Columbus, Cook, Vasco Nunez etc.
  • Sharing locations of relatives, holidays, visiting authors and the like.
  • The ideas are only limited to your imagination

In the coming week I will add a post to describe how to add a photo or link into your saved location.


Thursday 1 November 2012

iPad Lesson Plan - Using Mentimeter in the 2nd grade classroom

This week I am working with second grade students to create basic bar graphs / charts, using the free website Mentimeter - www.mentimeter.com

Mentimeter is a free website that allows you to create great looking graphs which are created in real time as people answer your question. The graph below was created by a second grader this morning in about 15 minutes.


What are the advantages of Mentimeter when working with younger students?
  • Quick and easy to use.
  • vot.rs - this is the address used to answer questions, super easy for children to input
  • Each question has a unique 6 digit number, again easy for young children to input
  • As a teacher you can create a free account and save your questions 


The lesson plan: Answering questions using Mentimeter & creating your own question to be answered by your friends

I have run this lesson in about an hour. If you had a little more time it would be easier, but certainly achievable in an hour. Completing this in 2 sessions would be best, one to introduce answering mentimeter questions, the other to create their own questions.

Starting out:

It is important to make sure the students are secure with using safari first:

  • Explain how to use the address bar, how to clear using the "x", and what the address will be to input: vot.rs
  • Talk about tabs, how to switch between, add a new tab, and remove tabs.
  • Explain that they will will use the tabs later in the lesson. This will be so the kids can answer survey questions and share their graph at the same time.

Introducing Mentimeter:
  • It's best if you set up an account with Mentimeter before the lesson and make 2 or 3 questions. Setting up an account is only needed if you want to save the questions.
  • Ask the kids to go and set up Safari, put in the vot.rs address, then return to the carpet.
  • Show them the number they have to input, ask them to input the number, answer the question and return to the floor
  • Examine the class data, you can talk about the number of respondents, how we could use the data etc.
  • Have students use the vote on another question button to answer the next question:

  • Have the children answer another 2 questions so they know the process of entering the number and submitting their answer
Students make their own survey:
  • Have students touch the "Powered by mentimeter.com" link to go to the website.


  • From here, show the kids how to enter a question, click on Create Question, and enter in 3-4 answers. Then press, "Start Presenting"

  • At this point I encourage the children to use 2 tabs, one to watch their graph and share their question number, and the other to have the vot.rs site open so they can answer other children's questions. Second grade students seem to be able to do this quite easily with limited support.
  • The children can then walk around and answer their surveys. The children really enjoy this part of the lesson.

Things to watch out for:
  • If the graph doesn't update, just refresh the page
  • Students can only vote once from a single device
  • With younger kids take some time to explain how to input addresses and how to use tabs in Safari
Sharing and saving the graph:
  • There are a number of share options such as embedding which can be accessed from the Share button on the graph page.
  • You can also teach the students how to take a screen shot on the iPad so that they can keep an image of the graph for use in another program on the iPad or to add to a blog etc as a static image.


Mentimeter example:

Below is an embedded version of a Mentimeter question I created for this post. If you'd like to add to the answers just click on this link: http://vot.rs/99b5e3


Possible uses:

  • Basic surveys
  • Asking children what they would like more instruction in. i.e. Would you like to know more about bold beginnings or editing in writers workshop?
  • Getting feedback from parent groups
  • Follow up / exit tickets to class


Although this is quite a long post, I think it's a great tool to use in the classroom and has lots of uses. I hope you find it useful too.


Shaun Kirkwood
Educational Technology Coach - Singapore American School

Wednesday 10 October 2012

Printing Multiple Documents in Google Docs

Ever have to print multiple documents in Google Docs and wish that there was a faster way?

Well there is, this is a simple workaround to help you be more productive when printing from Google docs. Because there is a step involving converting to a PDF some formatting may be affected, but for the most part this is a great solution.

Step 1: Select all the files to print 

You can do this one by one, or if you have all the files in one folder you can select them all by using the check box at the very top of the list next to where it says "title" in Drive. Go to the "More" button and click on download.


Step 2: Download the files as a PDF document

At the next window you need to tell google docs to convert the files to PDFs. When you press download, it will process the files and then automatically download them all as one zip file.


Step 3: Unzip and open all the PDFs in Preview

Go to your downloads folder and find the zip file. You can move it to your desktop if that helps you to keep track of the files. When you double click on the zip file, it will create a new folder with the same name as the zip file, and place all of the files in there.


Step 4: Print from Preview

Highlight all the files, right click and go to "Open with" and select "Preview". If preview is your default viewer you can just press  - O to open them. When you print the files ( - P) you will see in the page count under the preview that it is printing all of the PDF files that were opened.


Although there are quite a few steps in this process, once you've done it once or twice it becomes straightforward, and it's much, much faster than opening and printing documents one at a time!

If you have any questions about the process, feel free to email me.


Posting to Blogger via Email

Posting to Blogger is a very easy process, but how great would it be if you could simply email directly to your blog? And what about if you're sending the same post to multiple blogs, this could really save you a heap of time and switching between accounts.

If you want detailed instructions to set this up, you can look at the google support site linked here:


Or you can follow these steps.

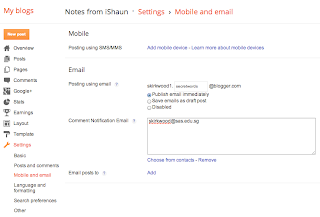
The first thing you need to do is go into the settings section of your blog this is the page pictured below. 
Once you click on settings, you need to then click on mobile and email.
About halfway down you will see "Posting using email". To start using this feature, you just need to fill in the "secretwords" box with something you will remember.

This will create the email address that you send your posts to. If my secret word was dog in this example the email address I would send posts to would be
Once you have your secret word in you need to press "Save Settings!" that's the most important part.

After you've done that, all you need to do is write your post. The email subject becomes your post title, and the body is the body of your post. You can even put images into your email and they will be added to the post as well.

Unfortunately you can't add labels onto your post when you email it in, but you can add them easily later on.
If you have any questions about this process please get in touch.
Have fun with this,

Shaun


Thursday 4 October 2012

iPad Storage and Charging

The following are some helpful tips I recently sent out to the staff in our primary school regarding charging and storage of classroom iPads.

Charging: avoid charging the iPads every day, recharge when they drop below 10%.

It is not necessary to keep the iPads fully charged all the time. The iPads have a battery life of about 8 hours, and even when they get to 10% will still generally last an hour or more in an actual lesson. Other schools have noted that iPad battery life reduces when the batteries are always being charged, so as a rule you should charge your class set of iPads when you see a few of them getting below 10%.

Don't let the children plug in the iPads when they put the iPads away. It is only necessary to plug them in when charging, and it is better to have an adult do this.


Storage:

If you want to keep your iPads in a cupboard rather than in the carts, that is fine, just make sure that they are in a lockable cupboard and not stacked higher than 6 iPads in stack.


Tuesday 25 September 2012

Automatically making your Goals and Strengths Sheets

With Strengths and Goals coming up, this blog post describes a method that you can use to automatically create a Strengths and Goals document for each student in your class.

I have shared the documents that you need in the 2nd grade shared folder under Strengths and Goals. This process requires using a document template and a spreadsheet. If you have difficulty following along with the video, I would recommend replaying short sections of it, to see if it makes more sense the second time around.


Tuesday 14 August 2012

Attaching documents quickly into Gmail online

Just like you can drag and drop files directly into Google Docs, it is also possible to drag and drop attachments into emails. In general it is probably easier to simply share documents using Google Docs, however there will always be times when you want to send out attachments such as when you are emailing parents photos and the like.

The following video gives a quick explanation of the process.


An easy way to upload to google docs.

As I have been traveling around to different teachers in our team, we have discovered some great ways to make uploading documents to google docs much easier. In particular we found that it can be as simple as dragging and dropping your files straight into the collection (folder) that you have opened, even if it's a shared folder.

Following is a short video that I made this evening which explains the process.